Email Suffix Matching Catch All on Office 365
Long time readers will know that over the years I’ve moved email providers several times, starting out with POP3 mailboxes on Gradwell, moving some of my domain’s users to Google with forwarders, and for a long period running my own Microsoft Exchange server. On each platform I’ve made use of email suffix matching. I’ll quote from my earlier post about that:
Email Suffix Matching is useful feature enabled on some ISPs mail servers. If you have a GMail account you may be familiar with the approach. Say you have an email [email protected]. Gmail will actually deliver mail to [email protected]; you can add any suffix you like after the + and GMail will still deliver it to your inbox. Some others ISPs support this by allowing you to place a period after the local part so you can use [email protected]. You don’t have to create these email addresses anywhere – you can just start using it and the mail server will make sure it gets to your inbox.
This is fantastically useful because it means that when a website asks for your email address you can give out a custom throwaway email just for that site. So when you sign up at DodgyCo.com, you give them the email [email protected]. If you ever receive spam because DodgyCo sold your email address you’ll know a) who sold you out, and b) which email address to add to your spam filter.
I’ve been using the pattern prefix.anything@durdle.com format on Gradwell’s servers since I registered the domain in 1999. This weekend, after putting it off for literally years, I removed the last Durdle.com email elements from their home at Gradwell and migrated the entire Durdle.com domain to Office 365. Office 365, according to their support team, does not support email suffix matching or “catch all” mailboxes. Exchange Server itself, officially, doesn’t support it either, hence my creation of the Transport Agent to enable it.
Except it turns out that Office 365 can be made to support it, with a bit of fiddling.
Suffix Matching Catch All on Office 365
We need to create what On Premises Exchange admins know as a Transport Rule. These are available in Office 365 under Exchange -> Mail Flow -> Rules.
- All your recipients must be on Office 365 it won’t work in split scenarios. I used to run a split setup with some mailboxes on Gradwell and some on an On Premises Exchange Server.
- Your domain’s MX records must point to Office 365.
If you have a default setup of Office 365/Exchange Online you meet these criteria.
How it Works
By default Office 365 is authoritative for your domain, that is it believes that if it can’t find a mailbox matching the inbound email’s desired TO: it should reject it. We’re going to change that so it is no longer authoritative. It’ll believe that those inbound emails could match mailboxes on another system which it has to forward them to. We’ll create a rule that catches them before that happens and forwards it to a known mailbox on Office 365.
In my case I have multiple rules that match regular expressions on the TO: field and direct to different mailboxes. You can set up a single catch all mailbox if that’s all you need.
I’ve been running this for a few days now on my Office 365 deployment: a no frills Exchange Plan which provides Exchange and nothing else.
Stop Office 365 from being Authoritative for your domain
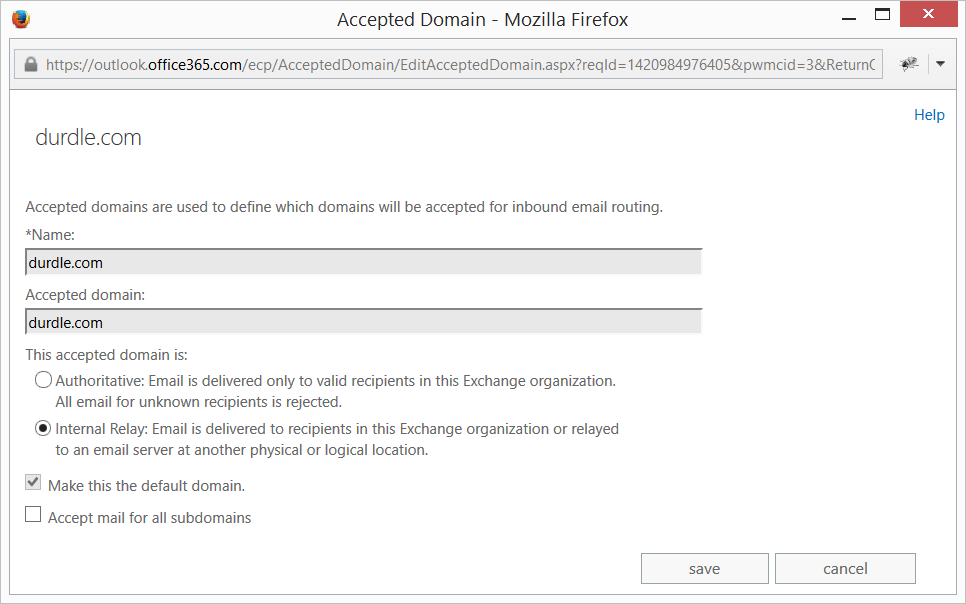
- As an admin, navigate to Admin -> Exchange -> Mail Flow and click Accepted Domains.
- Select your domain and click the edit button (the pen icon).
- In the pop up under This accepted domain is check the radio button from Authoritative to Internal Relay.
- Click Save.
- Ignore the dire warnings.

Create the Suffix Matching Rule
You need a mailbox to receive the suffix matched email.
You also need a group (I called it All) that directly contains (no nested groups) all the mailboxes and groups that should not be diverted. This group has to contain the catch all mailbox itself.
- As an admin, navigate to Admin -> Exchange -> Mail Flow and click Rules.
- Click the + icon then Create a new Rule…
- In the new rule pop up, click More Options… near the bottom.
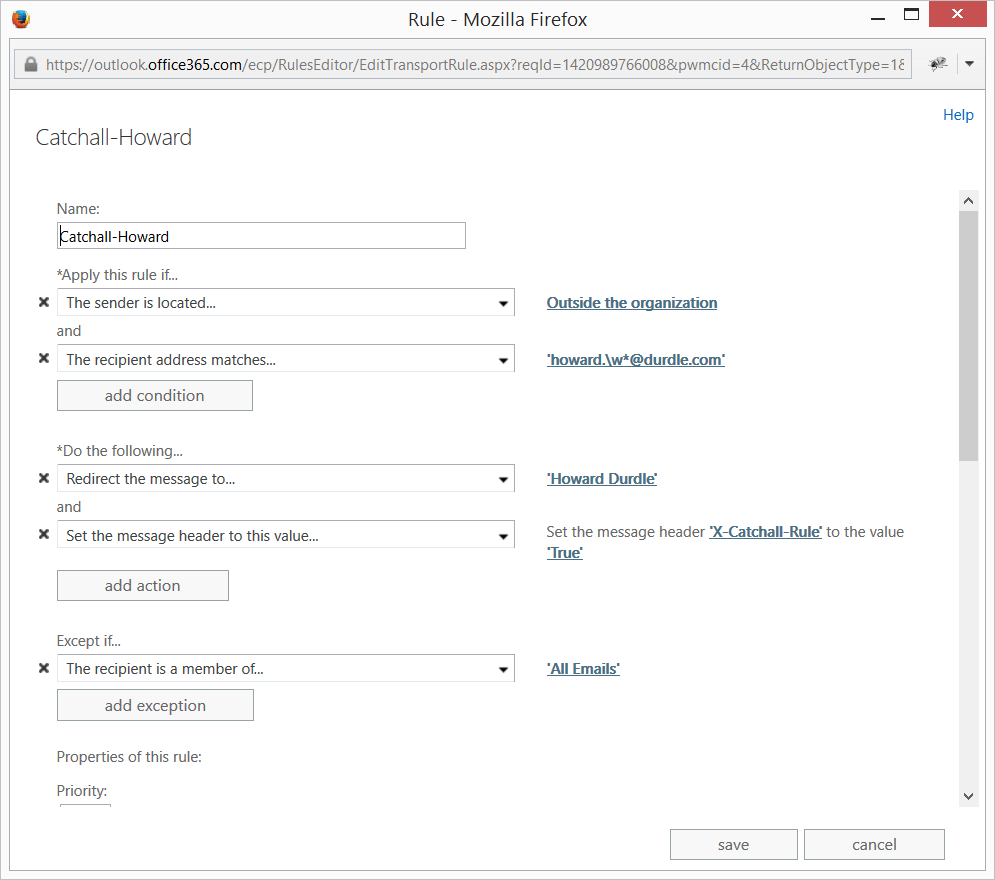
- Name the rule, in my case this is Catchall- followed by the email prefix I’m working with: Catchall-Howard
- Change Apply this rule if… to The Sender is… -> Internal/External –> Outside this organisation
- Add another Apply this rule if… and set the value to a regular expression that’ll match incoming emails. I use: howard.\w*@durdle.com
This matches howard. (note the period) and then any word before the @durdle.com. - Change Do the following… to Redirect the message to… –> These recipients –> then select your catch-all mailbox, in my case this is my main inbox.
- OPTIONAL: Click Add Action and then Modify the message properties –> Set a message header.
Set the header to X-Catchall-Rule and value to True - Under Except if click Add action and then If Recipient.. -> Is this person –> and select the All group which contains all exclusions
- Click Save.

Create the Catch All Final Rule
Now any message sent to [email protected] will be accepted and delivered to my mailbox. Unfortunately, anything sent to any other invalid email will be accepted, then bounced to outbound processing, then the MX settings will result in a mail loop and a too many hops error. Ultimately the message will get bounced to the sender, but this is ugly. We need a rule to fix that.
- As an admin, navigate to Admin -> Exchange -> Mail Flow and click Rules.
- Click the + icon then Create a new Rule…
- In the new rule pop up, click More Options… near the bottom.
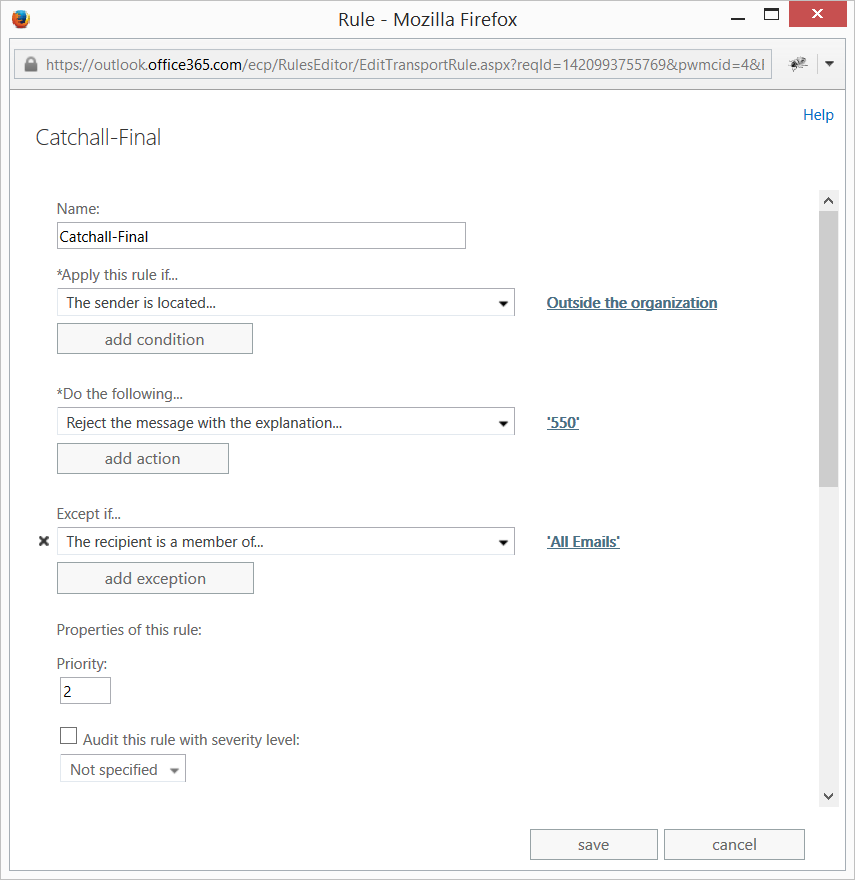
- Name the rule, in my case this is Catchall-Final.
- Change Apply this rule if… to The Sender is… -> Internal/External –> Outside this organisation
- Change Do the following… to Reject the message with the explanation… then write 550 in the popup and click Save. This isn’t really a valid 550, but the result is still a blocked email.
- Under Except if click Add action and then If Recipient.. -> Is this person –> and select the All group which contains all exclusions
- Click Save.

Testing
Sending an email to a valid address will be unaffected – it will be delivered to the mailbox since the recipient exists.
Sending an email to [email protected] should get delivered to your chosen recipient mailbox. With the X-Catchall-Rule header applied (as above) you can check the headers to see that the rule caused the message to be delivered correctly.
Sending an email to an invalid recipient should now bounce with the 550 explanation. You can further edit this behaviour if you wish.
Powershell
Of course Office 365 wouldn’t be a modern Microsoft product if you couldn’t do everything via Powershell. In my experience life is usually a good deal more straight forward from the Powershell prompt versus the GUI. For example, once you’re connected to your Office 365 deployment in a Powershell prompt, here’s how to perform the Accepted Domain setup we did above:
Set-AcceptedDomain -Identity Domain.com -DomainType InternalRelay
Easy. This will generate the same warning as we received above.
The rules are not as elegant to create – a post for another time.
Enjoy Reading This Article?
Here are some more articles you might like to read next: